Are you looking for a way to cut curves with precision? You’ve come to the right place!
In this guide, you’ll discover how to use a jigsaw to make perfect cuts in all your projects. Whether it’s a tight corner or circular shape, learn the art of cutting curves with this easy-to-follow guide.
The jigsaw is an incredibly versatile tool for cutting curves in materials such as wood and metal. With the use of a specialized jigsaw blade it can easily traverse complex patterns, and will provide clean edges and curves in a variety of work pieces. It can quickly cut materials such as wood, plastic, and soft metals like aluminum or brass. However, when cutting curves with a jigsaw, it is important to understand the mechanics of the jigsaw blade to ensure you get the desired results.
This guide will go over the fundamentals on how to use a jigsaw for curved cuts, standard safety measures that should always be taken when using any power tools, feature explanations for different types of jigsaw blades and their purposes, guide you through choosing the ideal blade for your project’s requirements, as well as covering helpful tips to consider when attempting detailed or intricate cuts with a jigsaw.
Explanation of what a jigsaw is
A jigsaw is a power tool commonly used for cutting curves, circles and irregular shapes in wood or metal. It is designed to make straight and curved cuts by taking the material into and out of the body of the saw blade, as opposed to a circular saw, which cuts with a circular motion. There are two basic types of jigsaws: corded and cordless. A corded jigsaw runs from an AC outlet and is generally more powerful, while a cordless jigsaw runs on batteries and is lighter-weight but has less power.
The key components of a jigsaw include the base plate where you attach your pattern or guide line; the saw arm that moves up and down; and the blade itself. Blades come in different thicknesses (or “TPI”) depending on what type of material you’re cutting. Generally speaking, thinner blades are used for very fine detail work while thicker blades are used for larger projects such as making furniture pieces. For most average projects, regular TPI blades are adequate.
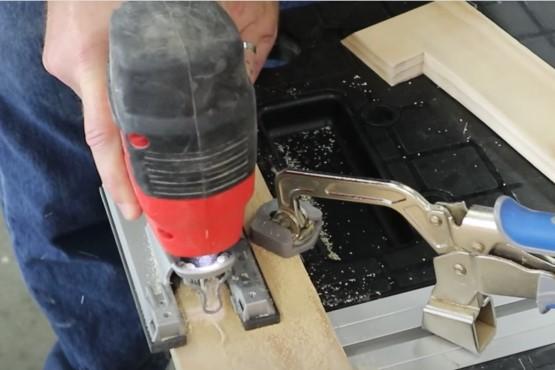
When using a jigsaw to cut curves, it’s important to pay careful attention to following the pattern or line precisely from start to finish. Moving too fast can result in inaccurate cuts or even destruction of your materials! When possible, use clamps or magnets to steady your workpiece before making each cut; this will help ensure accuracy over long-distance cuts where there may be slight wobbling coming off corners. Finally, use ear protection when cutting because electric saws can be especially loud!

Importance of mastering the art of cutting curves with a jigsaw
Mastering the art of cutting curves with a jigsaw involves much more than just knowing the mechanical operations of the saw. It requires an understanding of the relationship between your material, the saw blade and your pattern or template. Working safely is a primary consideration while using any type of power tool and especially so when cutting curved patterns with a jigsaw.
It is important to understand how to hold and support both stock and workpiece in order to produce precise cuts without risking injury.
Furthermore, you will need to become familiar with various types of blades available for jigsaws and learn how different blades can be used to cut different materials. You will also want to understand the proper speed settings for a given blade type-toothed blades should be used at higher speeds while slower speeds are more effective when using diamond embedded blades, for example. Additionally, you will need to decide when and where it is safe and appropriate to use clamps over freehand cutting with a jigsaw as different materials may require either technique for best results.
With practice, you can develop a range of skills that will help you make precise cuts on virtually any type of timber or other material that offers an edge suitable for and accessible by your jigsaw’s blade.
Choosing the Right Blade
The blade is the most important element when it comes to cutting curves with a jigsaw. Choosing the right blade can make all the difference between a successful cut and a messy mistake. The blades come in various shapes and sizes, each designed to perform different tasks.
To get started, let’s look at the two main types of blades: T-shank and U-shank.
T-Shank blades have a straight, uniform design that makes them easier to attach to your jigsaw’s clamp system. They are suitable for general woodworking projects involving straight or slightly curved cuts, but they are not recommended for more intricate cuts such as circles or tight curves.
U-Shank blades have a bigger surface mount that makes them ideal when you need more stability during your work. It also makes changing from one bit to another easier and faster. U-Shank blades are best for intricate projects that involve tight curves, turns or circles; they tend to lose less energy than T-shank blades due to their larger contact surface with the material being cut.
Explanation of blade teeth per inch (TPI)
Blade TPI or teeth-per-inch plays an important role in cutting curves with a jigsaw. While the choice of a blade depends on the material being worked on, choosing the right TPI for your task is essential. One should note that both the angle of each tooth and its shape are key components that determine how quickly or slowly a blade may cut through any given material.
The following explains how TPI affects cutting curves:
- Blades with fewer teeth typically make rougher cut edges and are suitable for working on thicker materials such as hardwoods and plastics. Low TPI blades between 3 and 6 are good for roughing out curved shapes in these materials, such as plywood or cardstock.
- Blades with more teeth typically make smoother cuts, although they can take longer to complete their task. Blades with 8 to 10TPI are suitable for intricate cuts into softer wood, and 12TPI blades can be used when making finer detailed cuts into metals and other thin materials, such as veneer or paper board. For making tight turns more easily, blades with 14 to 18TPI should be used where maximum finesse is required during cutting curves operations.
Discuss the different types of blades (wood, metal, and laminate)
When using a jigsaw to cut curves, the type of blade you use will depend on the material that you are cutting. Material such as wood, dipped in water or lubricant to reduce dust and heat buildup, will require the usage of a woodworking blade. These blades have rounded-over teeth with shallow gullets that leave a clean finish on the wood for beautiful curved cuts.
Metal blades are typically used for sheet metals, corrugated metals, or thin gauge steel material without being hindered by heat buildup from friction. The extra long blade will provide stability and accuracy when following intricate patterns and shapes.
When it comes to laminate boards such as plywood, particle board or hardboard, you may use either a high-speed steel (HSS) blade or a tungsten carbide tip (TCT) blade with small teeth that allow for smooth cuts through these hard materials with minimal chipping.
Overall, it’s important to remember that if your project requires extreme precision then it is best to invest in appropriate blades that can facilitate optimal performance and avoid damaging your jigsaw in the process!
:max_bytes(150000):strip_icc()/GettyImages-89796876-5b9728d54cedfd0050b268c6.jpg)
Explain the importance of choosing the right blade
Having the right blade for the job is crucial when cutting curves with a jigsaw. A blade that is too thick for the material will not be able to make smooth, precise cuts and will create saw marks on the material. On the other hand, a blade that is too thin will cause it to overheat or break easily. Choose a blade that is appropriate for your material — generally, the thicker and harder it is, the thicker your blade should be. The great thing about jigsaws is that they are designed to accept various types of blades, so you can get creative and experiment with different widths when needed.
When choosing a jigsaw blade, there are three main characteristics to look at:
-Teeth Per Inch (TPI): this measures the number of teeth per inch on a saw blade; higher TPI means a finer cut and smoother finish but may take longer to make each cut. Generally speaking, 6-14 TPI works best for cutting curves in wood while 15-24 TPI works best for cutting curves in metal
-Blade Material: Most jigsaw blades are made from high speed steel (HSS) due to its durability and strength; however, some blades come in thinner sizes that require the use of bi-metal construction or carbon steel rather than HSS
-Blade Geometry: one or two “set” teeth followed by an alternating pattern of angled teeth form an aggressive angle which helps slicing through materials quickly
Preparing the Jigsaw for Use
Before starting to cut curves with your jigsaw, it is essential that you set it up properly. This will ensure that the blade doesn’t slip during use and reduce the risk of injury.
To prepare your jigsaw for use:
- Select the correct blade for the job – there are blades designed for specific materials (wood, metal, plastic). If you are unsure which type of blade to use, check your manual.
- Install the blade correctly – make sure you don’t overtighten it; follow your jigsaw instructions for installation instructions.
- Adjust the speed setting – most jigsaws will have different speed settings; again, refer to your manual for guidance on what speed setting is suitable for different materials and tasks.
- Secure your work material in place – always secure your material in place with a clamp or some other type of fastening device to prevent slips or shifting during cutting and to ensure safety when using sharp blades at high speeds; be sure to check that any clamps or fasteners used are secure and won’t cause accidents if they come loose during use.
Installing the blade
When mounting the correct blade for your project, ensure that the teeth are pointing downward and facing away from you. Secure the blade into place by tightening the black lever at the base of your jigsaw unit as much as possible.
Once you’ve placed your blade, double-check it with a magnifying glass to make sure no teeth are bent or broken, and that all teeth are facing in one direction. This will help avoid any breakage in your cut and make all corners smooth and even.
Adjusting the speed
When it comes to cutting curves with a jigsaw, speed is the key. The ability of the saw to move quickly and precisely depends on the setting of its variable speed control. As a rule, you should set the saw’s maximum speed for curves. This ensures that the blade will move quickly enough to keep up with its relatively short cutting stroke. A slow-speed setting makes it difficult to make accurate cuts because it takes too long for the blade to travel through them.
You may need to experiment a bit with different speeds in order to find one that works best for your particular project. However, generally speaking, most jigsaws require you to use a medium setting (around 5-6 out of 16) when cutting straight lines and set the dial all the way up when cutting curves. To reduce kickback and breakage during curves cuts, it’s important not only to adjust your speed but also apply gentle pressure throughout each cut and avoid overloading or forcing your blade through tight corners or difficult shapes.

Conclusion
The jigsaw is a versatile and powerful tool, but with its versatility comes complexity. Taking the time to understand each of its components and how they interact can help you get the most out of your jigsaw. With practice, you’ll be able to cut curves and other shapes quickly and accurately.
You now have the knowledge needed to set up your jigsaw for optimal performance in any cutting situation. Experiment with different blade types, speeds, depths and angles to get the desired results every time. Have fun exploring the wide range of creative uses a jigsaw can offer!
FAQS
How do you cut curves on a jigsaw?
To cut curves on a jigsaw, use a fine-toothed blade, adjust the speed setting, and follow the curve markings closely.
Can you make curves with a jigsaw?
Yes, a jigsaw is a versatile tool that can be used to make curves and other intricate shapes.
Which tool is used for cutting curves?
Tools that can be used for cutting curves include a jigsaw, a scroll saw, and a coping saw.
How do you cut accurately with a jigsaw?
To cut accurately with a jigsaw, use a straight edge or a guide, mark the cutting line, and take your time to make steady and controlled cuts.
Can a jigsaw cut circles?
Yes, a jigsaw can be used to cut circles, but it requires a special jig or guide to ensure accuracy.
How do you cut out curves?
To cut out curves, use a jigsaw or a scroll saw with a fine-toothed blade, mark the curve line, and follow it closely while cutting.
What is jigsaw pattern?
A jigsaw pattern refers to the intricate shapes and designs that can be cut using a jigsaw, often used in woodworking and crafts.
What types of cuts can the jigsaw do?
A jigsaw can make a variety of cuts, including straight cuts, curves, bevel cuts, and plunge cuts.
What jigsaw blade for curves?
For cutting curves with a jigsaw, a narrow blade with a fine-toothed edge is recommended for better control and precision.
What is the best tool for cutting curves in paper?
For cutting curves in paper, a pair of sharp scissors or a craft knife with a curved blade is recommended.
See Also:
- Best bosch jigsaw
- Best corded jigsaw
- Best cordless jigsaw
- Best dewalt jigsaw
- Best jigsaw blade for laminate countertop


